← Go Back to the Impact Challenge Table of Contents
This week we’re going to dig into the research platform that’s most often used by researchers: Google Scholar.
Google Scholar is a popular way to showcase your papers and the citations they’ve received. Google Scholar also calculates a platform-dependent h-index, which many researchers love to track (for better or for worse).
In this week’s challenge, we’re going to get you onto Google Scholar, so you can up your scholarly SEO (aka “Googleability”), more easily share your publications with new readers, and discover new citations to your work.
Step 1: Create your basic profile
Log on to scholar.google.com and click the “My Profile” link at the top of the page to get your account setup started.
On the first screen, add your affiliation information and OU email address, so Google Scholar can confirm your account. Add keywords that are relevant to your research interests, so others can find you when browsing a subject area. Provide a link to your OU faculty or lab homepage, if you have one.
If there are others who share your name, their articles may show up as yours at this point. Don’t despair! Go ahead and add those articles, even though they’re not yours. You will then have a chance to delete them in the next step (and as part of this week’s homework).
Click “Next,” and – that’s it! Your basic profile is done. Now, let’s add some publications to it.
Step 2: Add publications
Google has likely already been indexing your work for some time now as part of their mission as a scholarly search engine, so this step is pretty easy..
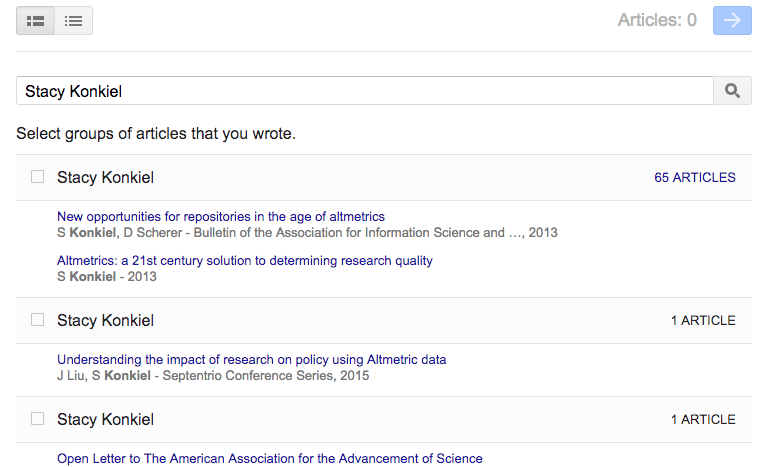
Google Scholar will provide you with groups of articles they believe belong to you. Select any group that is your work. If you don’t see your articles in a group, click "Search articles" to do a search, and add your articles one at a time. Click the blue arrow at the top left of the page to move on to the next step.
As mentioned above, there may be publications in the article groups that you do not want included on your profile. These may include newsletter items or articles that do not reflect your current research interest. They may also include articles from researchers other than yourself. You can manually delete those after you have created your account.
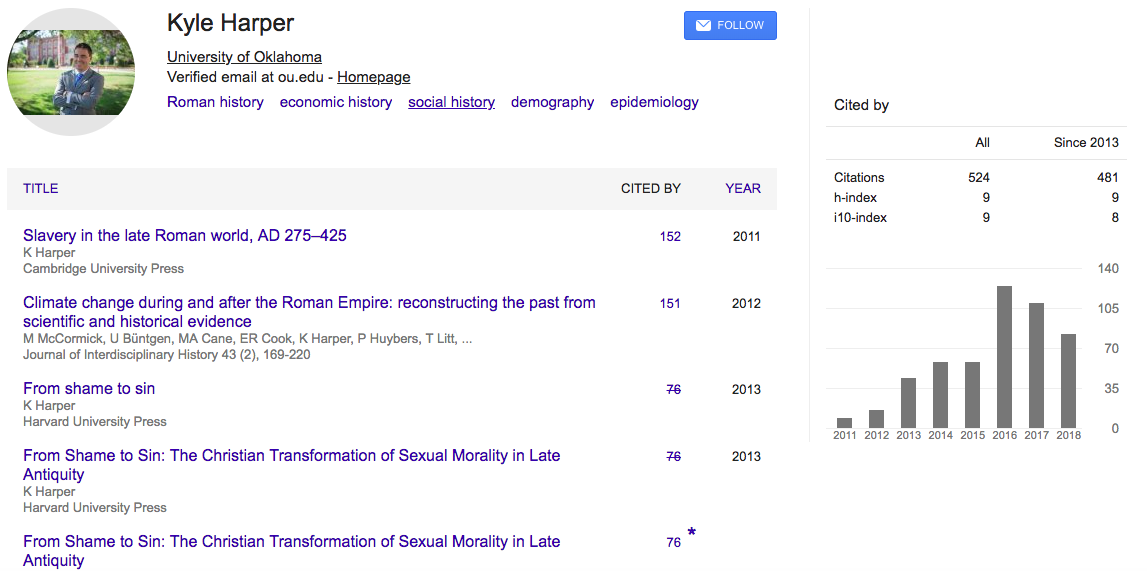
Your profile is now almost complete! Two more steps: add a photo by clicking your avatar next to your name and profile information, and set your private profile to “Public.”
Step 3: Make your profile public
Your profile is private if you’ve just created it. You can change your profile visibility by clicking the pencil icon next to your name and checking “Make my profile public” in the window that appears. If, at any time, you want to revert your profile to private again, you can do so by clicking the pencil icon next to your name.
Bonus: Add co-authors
While your profile is technically complete, you’ll want to take advantage of Google Scholar’s built-in co-authorship network. Adding co-authors is a good way to let others know you’re now on Google Scholar, and will be useful later on in a challenge, when we set up automatic alerts that can help you stay on top of new research in your field.
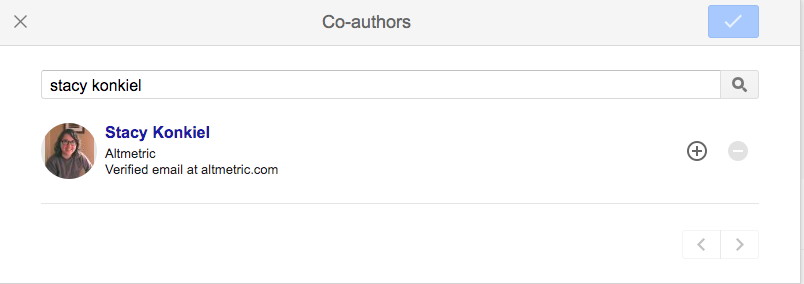
To add a suggested co-author, find the “Co-authors” section on the right-hand section of your profile just underneath the “Cited bar” bar graph. Click “EDIT” to the right of “Co-authors.” In the window that appears, you can search for your co-authors. If they have a Google scholar profile, you can select the plus sign next to their name to add them to your co-author list. After you’ve selected the plus sign, you will need to then click on the blue check mark at the top of the window.
That’s it! Now you’ve got a Google Scholar profile that helps you track when your work has been cited both in the peer-reviewed literature and is another scholarly landing page that will connect others with your publications. The best part? Google Scholar’s pretty good at automatically adding new stuff to your profile, meaning you won’t have to do a lot of work to keep it up.
Limitations
Dirty data in the form of incorrect publications isn’t the only limitation of Google Scholar you should be aware of. The quality of Google Scholar citations has also been questioned, because they’re different from what scholars have traditionally considered to be a citation worth counting: a citation in the peer-reviewed literature.
Google Scholar counts citations from pretty much anywhere they can find them. That means their citation count often includes citations from online undergraduate papers, slides, white papers and similar sources. Because of this, Google Scholar citation counts are much higher than those from competitors like Scopus and Web of Science.
That can be a good thing. But you can also argue it’s “inflating” citation counts unfairly. It also makes Google Scholar’s citation counts quite susceptible to gaming techniques like using fake publications to fraudulently raise the numbers. We’ve not heard many evaluators complaining about these issues, but it’s good to be aware of them.
Google Scholar also shares a limitation with two scholarly social media sites we’ll be exploring in later challenges: ResearchGate and Academia.edu. Each of these sites are somewhat of an information silo. You cannot export your citation data, meaning that even if you were to amass very impressive citation statistics on the platform, the only way to get them onto your website, CV, or an annual report is to copy and paste them – way too much tedium for most of us to endure. Their siloed approach to platform building definitely contributes to researchers’ profile fatigue.
Its final major limitation? There’s no telling if Google Scholar will be around tomorrow. Remember Google Reader? Google has a history of killing beloved products when the bottom line is in question. It’s not exaggerating to say that Google Scholar Profiles could literally go away at any moment. Google Scholar is not alone in this; we recognize that several of the services in the OU Impact Challenge could suffer the same fate. That’s why one of the most important challenges will come in a few weeks – uploading your work to SHAREOK.
Homework
Google Scholar can only automate so much. To fully complete your Google Scholar profile, let’s manually add any missing articles. And let’s also teach you how to export your publication information from Google Scholar, because you’ll want to reuse it on other platforms.
1. Add missing articles
You might have an article or two that Google Scholar didn’t automatically add to your profile. If that’s the case, you’ll need to add it manually.
- Click the “+” button in the grey toolbar above your listed articles.

- Select “Add articles manually” from the dropdown menu. Then you should see this screen.
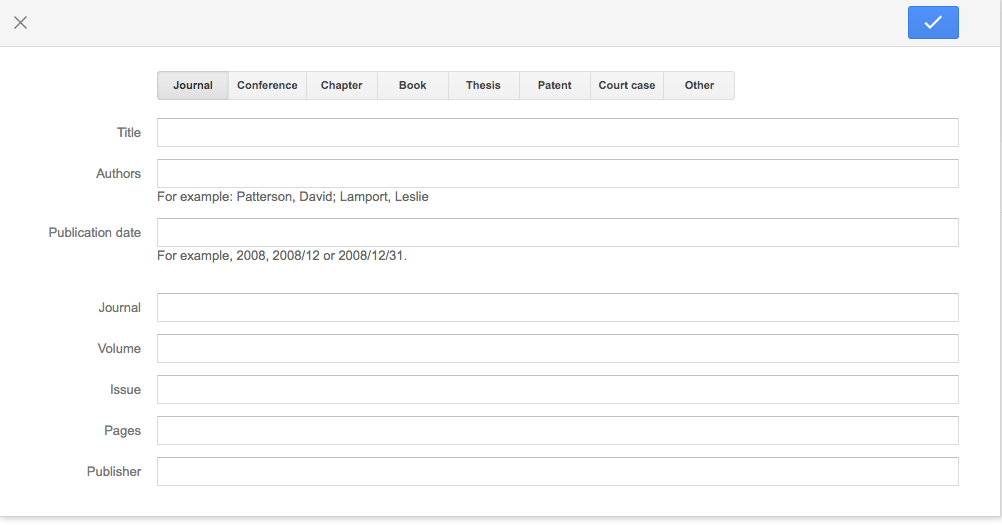
It’s here where you can add new papers to your profile. Include as much descriptive information as possible – it makes it easier for Google Scholar to find citations to your work. Click “Save (the blue check mark at the top right of the window)” after you’ve finished adding your article metadata, and repeat as necessary until all of your publications are on Google Scholar.
2. Clean up your Google Scholar Profile data
Thanks to Google Scholar Profiles’ “auto add” functionality, your Profile might include some articles you didn’t author. If that’s the case, you can remove them in one of two ways:
- Clicking on the title of each offending article to get to the article’s page, and then clicking the trash can in the top right of the pop up window.
- From the main Profile page, ticking the boxes next to each incorrect article and selecting the “Delete” from the grey bar above your articles
Google Scholar will automatically update your profile when it finds new publication it believes are yours.
You can keep a close eye on what articles are automatically added to your profile by signing up for alerts and manually removing any incorrect additions that appear. Here’s how to sign up for alerts:
- Click the blue “Follow” button at the top of your profile
- Select “New articles in my profile”
- Enter the email address where you want these alerts sent
- Click “DONE.”
3. Learn how to export your publications list in BibTeX format
There will likely be a time when you’ll want to export your Google Scholar publications to another service, and we’ll ask you to do that in a future challenge. If you already have accounts with other services, here’s how to export in BibTeX format. Please know: one of the reasons we had you sign up for ORCiD first, is that this can often be done automatically through ORCiD’s syncing capabilities. But for other times you may want to export in BibTeX format:
- Tick the box next to each article whose details you want to export. (If you want to export all your articles, tick the box to the left of TITLE in the gray bar above the list of your works.) Click the "Export" button, and then choose BibTeX to export your file. You will get a browser window with your citations in BibTeX format, which you can then “Save as…” or copy/paste to a text editor and save.
- Using the same instructions above, you can also download your citations as a .csv file or for EndNote. These files download directly to your computer.
In future challenges, we’ll also cover how to use Google Scholar to stay abreast of new research in your field and new citations to your work.